Relaxed Carving Moments: Weekend DIY Home Makeovers
Want to refresh your living space without spending a lot of time or money?
Here are six simple and fun DIY home improvement projects you can complete in just one weekend. Whether you’re a beginner or an experienced DIY enthusiast, with a precise and handy engraving tool, you can bring small yet creative transformations to your home.
Decorate Your Staircase with a Gallery Wall
Creating a “storytelling” staircase gallery wall is one of the best ways to express warmth at home. In addition to hanging photo frames, you can use an engraving pen to carve small patterns or words on the edges of wooden or acrylic frames — for example, your family members’ names, dates, or short quotes.
- Steps & Tips: Lightly mark the carving area with a pencil first. Use an electric engraving pen and choose a fine engraving needle to outline the lines, then switch to a thicker tip for a 3D effect. After carving, gently sand the edges with sandpaper and apply a clear wood wax oil to prevent moisture damage.
- Pro Tip: Secure the frame before carving to avoid slipping. If you’re working on acrylic, use a low-speed setting to prevent heat melting.
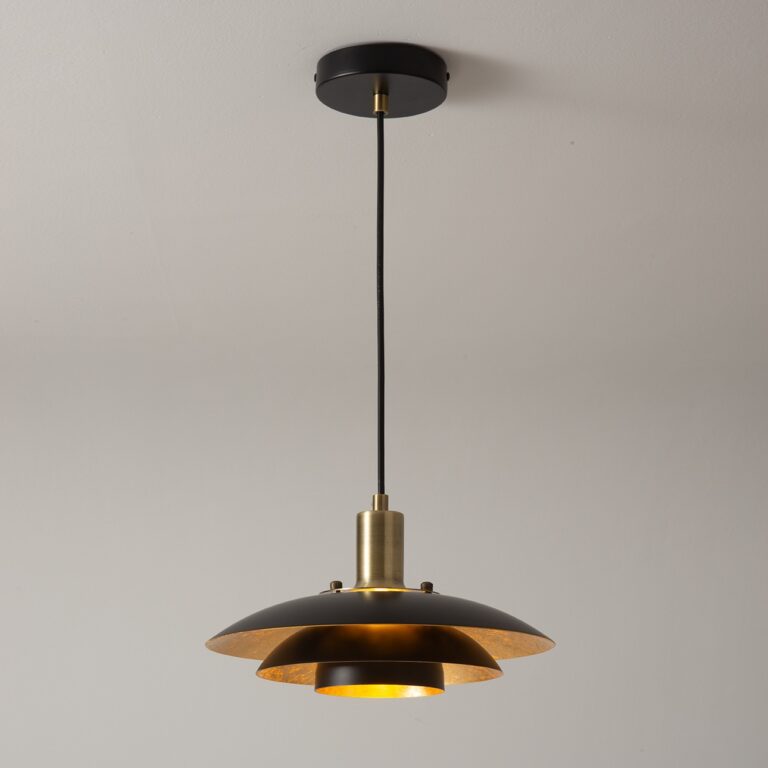
Make a Hanging Wireless Wall Lamp
Adding a wireless wall lamp to your living room or bedroom is easy — but carving personalized patterns or names on the lampshade turns it into a one-of-a-kind artwork.
- Engraving Advice: Choose a wooden or metal lampshade and use an engraving pen to carve stars, leaves, or moon patterns. Move slowly along the edges and avoid applying too much pressure. After engraving, spray on a coat of heat-resistant clear paint to extend its life.
- Tip: Use LED bulbs to reduce heat buildup and prevent the carved surface from yellowing. Install one on each side of your bed to create a soft and cozy glow.
Add an Artistic Frame Around Your TV
If your TV wall feels too plain, try adding a carved wooden frame around it. It blends technology and style perfectly, making your living room the center of attention.
- Engraving Steps: Choose lightweight pine or bamboo for the frame. Use an engraving pen to carve geometric patterns or flowing lines along the edges. After engraving, color the lines with a metallic pen or keep the natural wood tone for a rustic look. Use Velcro to attach the frame around the TV for easy removal and cleaning.
- DIY Tips: Start with shallow lines and gradually deepen them. If you’re using an electric engraver, enable the dust removal feature for cleaner results.
- Reminder: Pick a frame color that complements your room décor. Ensure it doesn’t block any TV sensors or buttons.
Create a Coffee Bar
A personal coffee bar can completely transform your mornings. This cozy corner isn’t just for brewing coffee — it’s a space to show your personality.
- Engraving Inspiration: Choose a spot in your kitchen or dining area. Gather essentials like your coffee machine, mugs, and storage containers. Pick small wooden furniture pieces that can be carved — such as trays or boxes — and engrave words like “Coffee Time” or “Good Morning.” On mug racks or shelf edges, carve coffee beans, leaves, or cat motifs to add warmth to every detail. Use a stencil to guide your lines for smoother results.
- Precautions: Wipe away dust with a soft cloth after engraving to prevent residue near food areas. Avoid carving directly on ceramic mugs — instead, use bamboo trays or wooden tags.
- Tip: Add decorative elements like coffee signs or small plants for extra charm. Keep only the items you use daily to maintain a clean, minimalist look.
Add a Framed Touch to Ordinary Doors
Doors are the face of your home. Adding a three-dimensional frame can already make them pop, but carving fine lines or a nameplate around the edges instantly elevates the texture and style.
- Engraving Method: Carve clean linear borders along the frame edges or the lower part of the door. For solid wood doors, choose deep engraving for a 3D look; for laminated doors, use shallow carving with outline painting. Apply wood wax oil afterward to seal and enhance color.
- Engraving Tip: Use clamps or a straight-edge guide to keep lines aligned. Avoid carving for long periods to prevent the tool from overheating.
Add Unique Patterns to Solid Wood Cabinets
Want your solid wood cabinet to look more artistic and unique? Try adding distinctive patterns! This step enhances the cabinet’s character and brings new life to plain wood surfaces.
- Steps & Techniques: Search online for simple, unified designs such as geometric shapes, plant motifs, or ethnic-style patterns. If you’re a beginner, start with easy wave lines or leaf shapes. Next, sketch the outline lightly on the surface with a pencil, ensuring balance and proportion. Use masking tape as a guide to stay straight. If you have an electric engraving tool, carve shallow textures to blend naturally with the wood grain, or use a wood-burning pen for deeper color contrast. When the pattern is complete, sand the surface lightly and finish with beeswax or wood oil to protect and highlight the details.
- Pro Tip: Test on a scrap piece first if you’re nervous. Keep your hand steady and maintain even pressure to avoid dark burn marks.
Turn Your Ideas into Reality with Kat’s Engraving Pen Series
Ready to create something truly unique for your next weekend project? Grab your engraving tool and let every carved line become a beautiful detail in your life.
Our multifunctional electric engraving machines and portable engraving pens make your DIY projects easier and more efficient. Designed for precision and control, they pair perfectly with a compact portable saw stand — ideal for on-the-go cutting. These innovative and versatile tools are made for DIY lovers like you — they’ll elevate your craftsmanship.
Are you ready? Let’s create something amazing together!