When AI Photo Editing Moves Beyond Single Functions, Creators Gain More Than Speed
Every few months a new batch of AI image tools arrives with similar promises: smarter edits, fewer clicks, and results that feel closer to what a human retoucher would deliver. But the gap between promise and daily usability remains wide in 2026. Many tools excel at one specific task yet fall short when a project demands multiple editing stages on the same image. That fragmentation forces creators to shuttle files between platforms, and every transfer introduces friction, format inconsistencies, and extra minutes that accumulate into hours over a week of production. This is precisely where the current generation of unified AI editors attempts to close the loop. One platform I spent several days testing is an AI Photo Editor that structures its entire experience around a single design conviction: the workflow should start from an uploaded source image, not from a blank prompt field.
This is a subtle but consequential design choice. It signals that the tool is built for people who already have visual assets and want to transform them—rather than for those experimenting from scratch with text-to-image generation. In the following sections, I walk through what I observed during hands-on testing, what the platform handles reliably, and where it still asks for patience.
Testing Framework and What I Wanted to Learn
I set up a series of real-world editing tasks rather than running isolated feature demos. The goal was to understand how the platform behaves when one image needs to move through multiple editing stages—enhancement, background removal, style transfer, and object erasure—without leaving the browser tab. I also paid close attention to how clearly the interface communicates what each tool does, and whether the AI interprets editing instructions in a way that matches user intent on the first attempt or requires iterative refinement.
The platform integrates multiple AI engines under one roof, including Nano Banana, Flux, Seedream, and Veo models. Rather than relying on a single model for every task, it routes different editing jobs through different engines. In my testing, this structural choice mattered more than the spec sheets suggest. When I ran the same portrait through enhancement and then background removal, the system did not degrade the subject’s facial detail between operations—a common pain point in tools that apply aggressive compression or re-sampling between steps.
What the Platform Handles Across Editing Categories
Image Enhancement That Preserves Subject Detail
I started with a batch of product photos shot under mixed indoor lighting—the kind of images where skin tones on a hand holding a ceramic mug look slightly different from the mug itself due to shadow unevenness. The enhancement tool applied adjustments that evened out exposure without flattening texture. What stood out was that the ceramic surface retained its subtle speckled glaze pattern rather than being smoothed into a uniform gray blob, which I have seen happen in several basic AI enhancers.
The platform supports up to four reference images for consistency when using certain models. This is particularly relevant for e-commerce catalog work where multiple product shots need to maintain the same color temperature and contrast profile. From a practical user perspective, this feature reduces the back-and-forth tweaking that typically eats into a product photographer’s morning.
The limitation worth noting: enhancement quality depends noticeably on the source image resolution. When I fed it a heavily compressed JPEG under 500KB, the AI could recover some sharpness but introduced faint halo artifacts along high-contrast edges. Feeding it a cleaner source file produced cleaner output—a predictable trade-off, but one that first-time users should be aware of.
Background Removal and Object Erasure on Complex Edges
This is where many AI editors reveal their weaknesses. Hair strands, wispy fabric edges, and semi-transparent objects like glassware routinely confuse segmentation algorithms. I tested background removal on a portrait with flyaway hair against a busy street background, and on a product shot of a wine glass half-filled with red liquid.
On the portrait, the edge detection preserved individual hair strands reasonably well. There was a slight halo visible when I placed the subject on a pure white background at 200% zoom, but at normal viewing distances the result looked clean. On the wine glass, the AI correctly identified the semi-transparent areas where the red liquid met clear glass, which is a tougher ask than solid-object segmentation. Results may vary with more complex transparent objects like layered glassware or ice cubes.
The object eraser worked reliably on medium-sized distractions—I removed a power outlet from a wall behind a desk setup, and the AI filled the gap with a plausible continuation of the wall texture. For larger objects that overlap with the main subject, the fill quality became less predictable, sometimes leaving a smudged patch that required a second pass.
Style Transfer With Variable Control Over Output Intensity
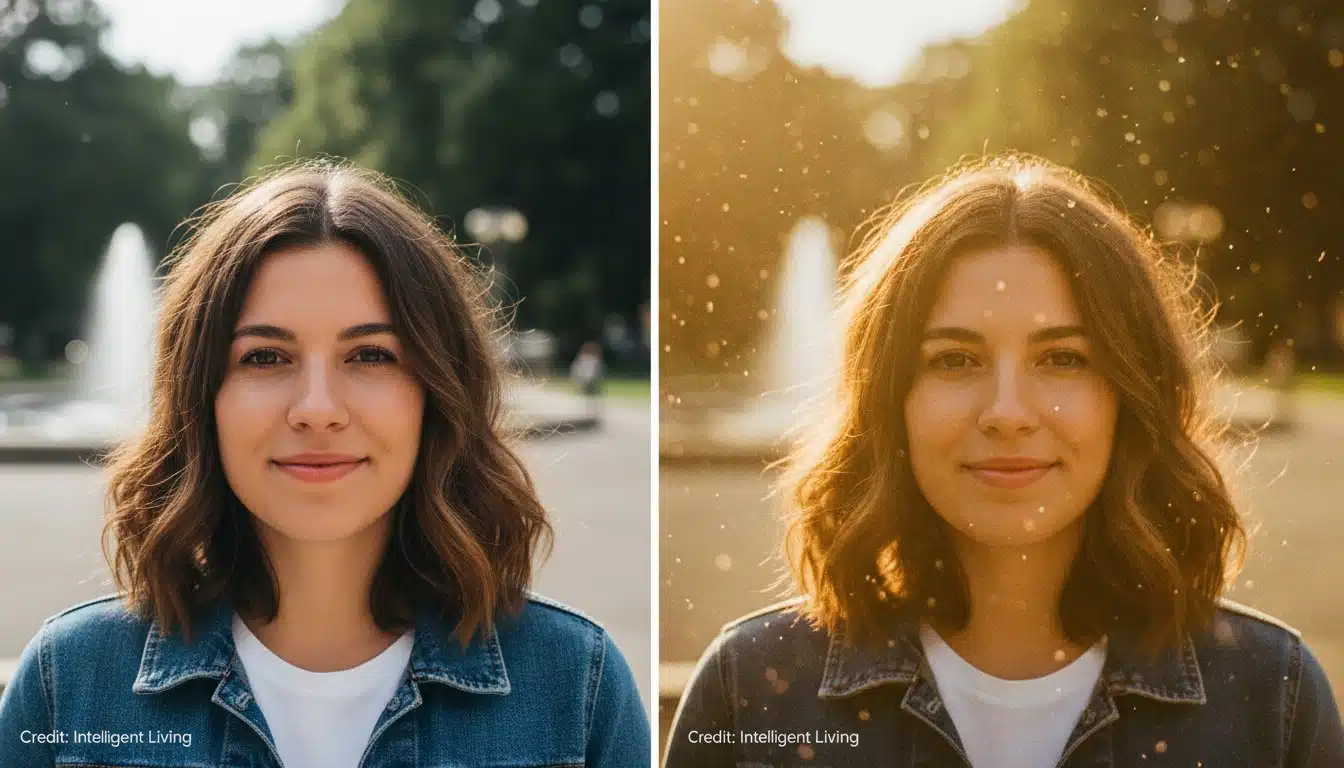
The style transfer function converts photographs into artistic renditions—from oil painting textures to digital illustration styles. I tested this on a landscape photo of a canyon at golden hour. The “cinematic” preset amplified the warm orange tones and added a subtle glow to the ridgeline without destroying the geological texture of the rock formations. The output felt stylized but still recognizable as the same location.
Where the tool showed its limitations was in finer stylistic control. Unlike some dedicated style-transfer applications that offer sliders for brush stroke intensity or color palette preservation, the current interface applies styles at a fixed intensity. You can describe adjustments in the prompt field, but the AI’s interpretation of “make it 30% more subtle” is not always consistent between attempts. This matters less for casual creative exploration and more for users who need precise, repeatable style matching across a series of images.
Face Swap Performance and Realism Factors
The face swap tool operates as a standalone module within the platform. In my testing, uploading a well-lit source portrait and a target image with similar head angle and lighting direction produced results where the swapped face blended naturally with the target body’s skin tone and lighting conditions. Skin texture continuity was the strongest aspect—freckles, pores, and subtle shadow transitions carried over without obvious compositing seams.
The realism factor drops when lighting conditions between the source and target images differ significantly. A face lit from the front placed onto a body lit from the side produces a mismatch that the AI cannot fully reconcile. This is not a failure of the tool so much as a physical constraint of photorealistic compositing—but users unfamiliar with lighting fundamentals may expect results that the current technology cannot deliver.
From available reports, the face swap feature can be accessed without account registration, and the interface prioritizes straightforward upload-and-process workflows. This lowers the barrier for quick one-off edits. Though power users working on batch face-swap projects will likely encounter the credit limits of the free tier.
Photo-to-Video Animation as an Extension, Not a Replacement
The platform includes a photo-to-video feature that adds motion to static images—cinematic push-ins, subtle parallax effects, and flowing water animations. I tested this on the canyon landscape photo. The tool added a slow forward zoom with slight cloud movement in the sky. The animation looped smoothly, and the output was a short video clip suitable for social media posts or presentation backgrounds.
This feature is best understood as a creative extension rather than a full video production tool. The animations are pre-set motion types, not fully customizable keyframe timelines. For a real estate agent needing a quick animated hero image for a listing page, the feature delivers clear value. For a videographer wanting precise control over motion curves and speed ramping, the tool will feel constrained.
How the Editing Workflow Actually Works on the Platform
Step 1: Upload Your Source Image
Starting from an Existing Photo Rather Than a Blank Canvas
The platform opens with an upload interface that accepts standard image formats. You bring in the photo you want to edit—the workflow is image-first, which means every subsequent editing action references this source file rather than asking you to generate content from scratch. The upload triggers no automatic edits; the image sits in the workspace exactly as you submitted it, waiting for your next instruction.
What the Upload Stage Signals About the Platform’s Design Philosophy
This design reinforces that the tool is meant for editing existing assets, not for pure generative creation. It is a subtle distinction that shapes the entire user experience. You do not need to learn prompt engineering before seeing any results. You simply provide the raw material and then describe what you want to change.
Step 2: Select Your Editing Tool
Choosing Among Enhancement, Background Removal, Style Transfer, and Object Erasure
After upload, the interface presents a set of editing tools organized by function: enhance, generative edit, style transfer, and photo-to-video. Each tool name describes what it does in plain terms rather than using technical jargon. You click the tool that matches your goal for this particular editing pass.
How the Tool Selection Menu Organizes Multiple AI Capabilities
The tool categories map cleanly to common editing tasks. Rather than burying options in nested menus, the platform keeps the main editing functions visible at the top level. If you want to enhance image quality, you click “Enhance.” If you want to remove the background, you click the background removal option. The mental model is straightforward: pick the action, then describe the specifics.
Step 3: Describe Your Desired Edit
Using Natural Language to Guide the AI’s Processing
Once a tool is selected, a prompt field appears where you describe what you want in natural language. For example, after selecting the enhancement tool, you might type “brighten the shadows on the left side of the subject’s face while keeping the background exposure unchanged.” The AI parses this instruction and applies adjustments accordingly.
What Happens When Prompts Are Vague Versus Specific
In my testing, the specificity of the prompt correlated strongly with output quality. Vague instructions like “make it look better” produced generic results that sometimes missed the mark. More detailed prompts—mentioning specific areas, lighting conditions, or desired color shifts—yielded outputs that matched intent more reliably. The learning curve here is not technical but linguistic: users benefit from learning how to describe visual changes precisely.
Step 4: Review and Refine the Output
Iterating on Results Without Leaving the Browser Workspace
The AI processes the edit and displays the result alongside the original. If the output meets expectations, you can download it or proceed to another editing step on the same image. If not, you refine the prompt and regenerate. The platform is designed so that all of this happens within one continuous browser session—no exporting to a separate app for the next stage.
When One Pass Is Enough Versus When Multiple Rounds Are Needed
Simple edits like background removal often succeeded on the first attempt. More subjective tasks like style transfer or object erasure on complex backgrounds sometimes required two or three rounds of prompt refinement. The platform does not charge per regeneration in the free tier, which makes iteration practical rather than penalizing. For paid tiers, credit consumption varies by plan.
Who Gains the Most From a Unified Editing Workflow
| User Profile | What They Typically Need | How the Platform Fits | Where It May Fall Short |
| E-commerce sellers | Batch product photo enhancement, background removal, catalog consistency | Multiple editing stages on one image without software switching; reference image support for consistent color profiles | Complex transparent objects may need manual touch-up |
| Content creators | Quick social media visuals, style transfers, animated posts | Photo-to-video adds motion to static images; style transfer offers artistic variety without manual painting | Fixed style intensity limits precise creative control |
| Portrait photographers | Skin tone preservation, background cleanup, face swaps for group photos | Enhancement retains texture detail; face swap handles well-lit, angle-matched portraits well | Lighting mismatches reduce face swap realism; results may vary |
| Marketing teams | Ad creative variations, object removal, brand-consistent edits | Natural language prompts lower the barrier for non-designers; commercial use rights included | Prompt specificity directly affects output quality |
| Casual users | One-off edits, family photo fixes, creative experimentation | Free tier available for essential features; no account required for some tools | Heavily compressed source images produce lower-quality outputs |
The platform fits best in workflows where the same image needs multiple types of editing in sequence. If you spend most of your time doing only one type of edit—say, exclusively background removal—then a specialized single-purpose tool may offer deeper controls. But for users who regularly enhance, remove, restyle, and animate within the same project, the unified approach eliminates the context-switching cost that accumulates when hopping between separate applications.
Realistic Limitations Observed During Testing
No editing tool handles every scenario equally well, and this platform is no exception. During my testing sessions, several patterns emerged that are worth acknowledging upfront.
Prompt quality directly shapes output quality. This is not unique to this platform, but it is pronounced here because so many of the editing functions rely on natural language instructions. A vague prompt like “improve the photo” will produce unpredictable results across different image types. Users who invest time in learning to describe visual changes precisely will see a faster path to consistent output.
Complex edge cases remain challenging. Semi-transparent objects, fine hair detail against busy backgrounds, and large-object removal that overlaps with main subjects all showed variable results. The AI handles these scenarios competently on average but cannot guarantee pixel-perfect output on the first attempt. Multiple regeneration rounds may be needed.
Consistency between editing passes can drift. When I applied enhancement, then background removal, then style transfer to the same image in sequence, the cumulative effect sometimes shifted the color balance in ways I did not anticipate. The platform does not warn when one edit might alter parameters that a previous edit had set. Users doing multi-stage edits should review the final composite carefully rather than assuming each stage operates in isolation.
The free tier includes essential features but comes with processing constraints that heavy users will encounter quickly. The platform describes itself as a “free picture editor at its core” with premium upgrades for high-volume processing. In practical terms, casual users testing the tool will likely find the free tier sufficient for evaluation. Professionals processing dozens of images daily will need a paid plan.
What Separates Image-First Editing From Prompt-First Generation
The most meaningful distinction between this platform and many AI image tools on the market is not technological—it is experiential. Prompt-first tools ask you to imagine an output and describe it from scratch. That works beautifully for creative exploration and ideation. Image-first tools ask you to bring something that already exists and improve it. That works beautifully for production work, where the starting point is a real photograph that needs refinement rather than reinvention.Neither approach is inherently better. They serve different moments in a creative process. A graphic designer might use a prompt-first tool to brainstorm concepts in the morning and then switch to an image-first tool to polish the selected photograph in the afternoon. The platform I tested sits squarely in the second category, and it benefits from that clarity of purpose. It does not try to be everything to everyone, and the interface reflects that focus.
The integration of multiple AI models rather than reliance on a single engine also distinguishes the editing experience. When one model handles enhancement and a different model handles style transfer, each can be optimized for its specific task rather than stretched to cover functions it was not designed for. The trade-off is that the underlying model switching happens invisibly—users cannot manually select which engine processes which edit. This keeps the interface clean but removes a layer of control that technically inclined users might want.
For creators evaluating whether this approach fits their workflow, the question is simpler than it first appears. If you already have photos that need editing—product shots, portraits, event coverage, social media assets—the image-first workflow will feel natural because it mirrors how you already think about your work. You start with what you have, and you describe what you want to change.The AI Image Editor platform tested here does not reinvent photo editing. It reorganizes it around a principle that should have been obvious from the start: the image comes first, and everything else follows.